
Last Updated on 09/2025 by Mom Goes Camping
If you want to go backpacking in the great outdoors, then a backpack is one of the most essential pieces of gear you need to have (duh; backpack is in the name! 🙂). After 15+ years of backpacking with my daughter and helping dozens of friends choose their first packs, I’ve learned that buying your first backpack can feel overwhelming. With hundreds of options and confusing technical specs, where do you even start?
The good news? It all comes down to six key factors: volume, torso length, hip size, comfort, compartments, and extra features. I’ve tested over 20 different backpacks through the years – from budget options to premium models – and I’m going to share everything I’ve learned so you can get the perfect pack for your adventures without the costly mistakes I made early on.
Why Your Backpack Choice Matters More Than You Think
Here’s something most guides won’t tell you: choosing the wrong backpack can literally ruin your trip. I learned this the hard way during a 10-day wilderness adventure when my poorly-fitted pack caused severe shoulder pain by day three. We had to cut the trip short, and I couldn’t lift my arms above my head for a week afterward.
A properly fitted backpack should feel like an extension of your body – you should barely notice it’s there, even when fully loaded. When you get it right, you’ll be able to hike longer distances comfortably and actually enjoy the experience instead of counting down the miles until you can take it off.
Types of Backpacks: Understanding What You Really Need
Let’s clarify what we’re talking about here – backpacks for trips where you’ll spend at least one night in the wilderness and carry ALL your gear. This means your pack needs room for your sleeping bag, food, clothes, tent, cook set, and safety essentials.
Day Packs (15-30 liters): These smaller packs work for day trips only. I actually bring my daughter’s day pack on longer trips so we don’t have to carry our huge packs when exploring from base camp.
Travel Backpacks (30-50 liters): Designed for hostel hopping and city travel. They often lack the external attachment points and durability features you need for wilderness backpacking.
Backpacking Backpacks (30-80+ liters): This is what we’re focusing on – packs built for multi-day wilderness adventures with proper load-bearing systems and weather protection.

Finding Your Perfect Backpack Volume: Lessons from Real Trips
Backpack volume is measured in liters, and choosing the right size depends on your gear, trip length, and packing style. Here’s where experience trumps theory every time.
My first adult backpack was a military surplus ALICE pack holding about 35 liters. I somehow crammed gear for both my daughter and me for a 10-day trip into that tiny space! We wore the same clothes multiple times and were definitely “aromatic” by the end, but it taught me valuable lessons about packing efficiently.

After years of testing different volumes on trips ranging from weekend overnights to two-week expeditions, here are my practical recommendations:
Volume Guide Based on Real Experience
| Liters | Best For | My Notes |
|---|---|---|
| 30-45 liters | 1-2 night trips, ultralight gear | Perfect for minimalists with high-quality compact gear |
| 45-65 liters | 2-5 night trips, standard gear | Sweet spot for most backpackers – versatile and manageable |
| 65-80 liters | 5+ night trips, winter camping | Great for longer adventures or when carrying group gear |
| 80+ liters | Extended expeditions, specialized trips | Only needed for specific situations like winter mountaineering |
Pro Tip: When in doubt, go bigger rather than smaller. I’ve never met a backpacker who regretted having extra space, but I’ve met plenty who struggled with packs that were too small. You can always compress a larger pack down, but you can’t magically create more room in a small one.
If you’re trying to save weight, check out my guide to budget ultralight backpacks.
Torso Length: The Make-or-Break Factor
As someone who’s 5’1″ tall, I cannot stress enough how critical proper torso fit is. This single factor determines whether you’ll enjoy your hike or suffer through it. If you’re petite or have a shorter torso, you may want to browse options in backpacks for petite women to find better fits.
The weight of your backpack should rest on your hips, not your shoulders. When the torso length is wrong:
- Too short: Weight crushes your shoulders, causing pain and fatigue
- Too long: Pack pulls you backward, affecting balance and stability
How to Measure Your Torso Length Correctly
You’ll need a friend to help with this measurement:
- Tilt your head forward and feel for the most prominent bump at the base of your neck (C7 vertebra)
- Find the top of your hip bones by placing your hands on your hips and feeling for the bony “shelf” (iliac crest)
- Have your friend measure the distance between these two points
Torso Length Sizing:
- Extra Small: Up to 15.5 inches
- Small: 16-17.5 inches
- Regular/Medium: 18-19.5 inches
- Large/Tall: 20+ inches
Critical Point: Never buy a backpack online without measuring your torso length first. Your height doesn’t always correlate with torso length – I know tall people with short torsos and vice versa.
Adjustable Torso Systems: Worth the Extra Weight?
Modern adjustable torso systems are game-changers, especially for families. My current pack adjusts from small to large, meaning my daughter can use it as she grows, and my husband can borrow it too. Yes, adjustable systems add 4-8 ounces, but the versatility is worth it.

Hip Belt Sizing: Don’t Overlook This Detail
While not as critical as torso length, hip belt fit still matters for comfort and load distribution. Measure around your waist at the top of your hip bones – not where your pants normally sit.
Many quality backpacks now offer adjustable or interchangeable hip belts. For example, some manufacturers offer small, medium, and large hip belts that can be swapped based on the user.

Some packs like the Lutsen 55L feature adjustable hip belts for better fit
Comfort Features That Actually Matter
After carrying backpacks for hundreds of miles, I’ve learned which comfort features are marketing gimmicks and which ones make a real difference.
Back Panel Systems
Suspension Mesh Panels: These hold the pack slightly off your back, creating airflow. Great for hot climates, but they can make the pack feel less stable on technical terrain.
Contoured Foam Padding: Sits directly against your back with strategic padding. Less ventilation but better load transfer and stability.

The Black Diamond Infinity 60 features contoured back padding that hugs your spine but can get sweaty

Shoulder Strap Design
Look for thick, contoured padding that distributes weight evenly. Women should specifically seek packs with shoulder straps designed for female anatomy – the difference in comfort is remarkable.
Load Lifter Straps: The Unsung Heroes
These short straps connect the top of your shoulder straps to the upper part of the pack. When properly adjusted (at about a 45-degree angle), they prevent the top of your pack from pulling away from your body. I’ve hiked with packs both with and without load lifters, and they make a huge difference in comfort on long days.

The Lowe Alpine Cerro Torre shows proper load lifter strap placement
Sternum Strap Adjustability
The sternum strap connects your shoulder straps across your chest, preventing the pack from shifting. Make sure it’s height-adjustable – as a woman, I can attest that having this strap in the wrong position is extremely uncomfortable!
Frame Types: Internal vs. External vs. Frameless
After trying all three frame types extensively, here’s my honest assessment:
Internal Frame (Recommended for beginners): Aluminum stays or carbon fiber rods inside the pack provide structure while maintaining a low profile. They hug your body and transfer weight to your hips effectively. Best for most hiking conditions.
External Frame: My first childhood pack was external frame, and they’re making a comeback. They promote excellent posture and make attaching bulky gear easy. Great for carrying heavy, awkward loads, but they can catch on branches and feel less stable on technical terrain.
Frameless: Only recommended for ultralight backpackers carrying less than 20 pounds total pack weight. Without proper support structure, heavy loads will make you miserable.

Alps Mountaineering external frame packs are making a comeback for their load-carrying ability
Essential Compartments and Organization
Pack organization can make or break your outdoor experience. Here are the features I consider essential based on real-world use:
Must-Have Compartments
Side Pockets: I was shocked when I recently shopped for backpacks and found many expensive models without side pockets! How are you supposed to access your water bottle? I drink every 5-10 minutes on the trail, and I’m not taking my pack off each time.
Sleeping Bag Compartment: Bottom-access sleeping bag compartments are incredibly useful. No more unpacking half your gear to get to your sleeping bag at the end of a long day.
Top Lid with Pockets: The brain of your pack should have both internal and external pockets. I keep frequently needed items like my headlamp, first aid supplies, and snacks here.
Hip Belt Pockets: Perfect for small essentials like lip balm, energy bars, or your phone. Much more convenient than digging through your main pack.
Nice-to-Have Features
Multiple Access Points: Some packs offer front-panel zip access or side zippers. These are convenient but can be potential failure points.
Internal Mesh Pockets: Great for organizing small items and keeping dirty clothes separate from clean ones.
Additional Features: What’s Worth the Extra Cost?
After years of testing various features, here’s what I actually use versus what’s just marketing:
Features Worth Paying For
Hydration Compatibility: Internal sleeve and port for hydration bladders. Even if you don’t use one initially, you might want this option later.
Built-in Rain Cover: Absolutely essential! Even “waterproof” packs leak through zippers. I use my rain cover as a bear hang bag too, getting double duty from it.
Compression Straps: These let you cinch down the pack when it’s not full and attach external gear. Super useful for varying trip lengths.
Features You Can Skip Initially
Removable Daypack: Cool concept, but the detachable daypacks are usually poorly designed. I prefer carrying a separate lightweight daypack.
Excessive Lash Points: A few gear attachment points are useful, but don’t pay extra for dozens of loops you’ll never use.
My Current Pack: Real-World Performance Review
I currently use the Lowe Alpine Cholatse II, and after two years and hundreds of trail miles, here’s my honest assessment: (Editors note: The Lowe Cholatse II is no longer available. The Skysper is a similar pack and a bit cheaper too).
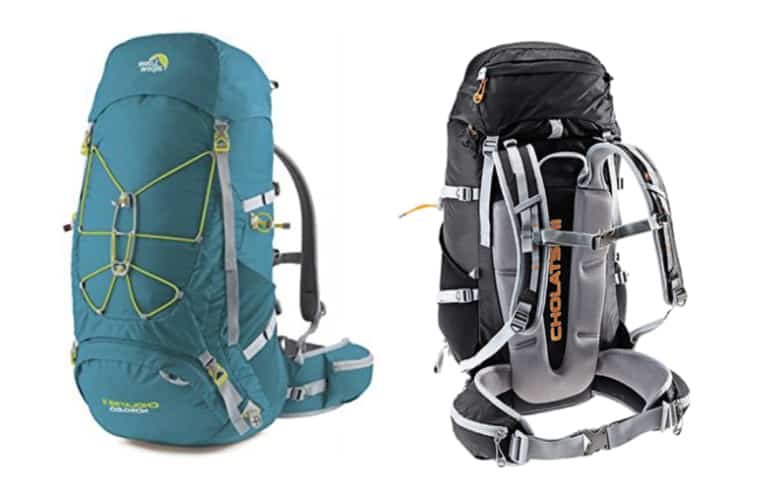
What I Love
- Multiple access points make packing and unpacking efficient
- Women-specific design fits my frame perfectly
- Load lifter straps and hip belt distribute weight excellently
- 50-60 liter capacity with compression handles all my trips
- Dual compartments in the top lid are surprisingly useful
- Lightweight construction doesn’t sacrifice durability
Areas for Improvement
- Side pocket material feels flimsy (though it’s held up so far)
- Rain cover doesn’t fit well when a tent is strapped on top
- Could use one or two more external attachment points

Everything needed for a 6-day backcountry adventure fits comfortably
Budget Considerations: Value vs. Cost
Quality backpacks range from $100 to $500+. Here’s how to get the best value:
Budget Options ($100-200): Look at brands like Teton Sports and High Sierra. They offer good features and durability for occasional use.
Mid-Range ($200-350): This is the sweet spot for most backpackers. Brands like Osprey, Gregory, and Lowe Alpine offer excellent quality and warranties.
Premium ($350+): Only worth it if you’re backpacking frequently or have specific needs like ultralight weight or specialized features.
The Father’s Pick: Thru-Hiking Perspective
My dad is a minimalist thru-hiker who’s tested countless packs over thousands of trail miles. After trying everything from ultralight frameless packs to heavy-duty expedition models, he settled on the Gregory Stout 65.
His choice came down to comfort – despite having back issues, he can carry this pack all day without pain. The detachable daypack feature has become one of his most-used features for side trips and town runs. At his age (he’s in his 60s), comfort trumps saving a few ounces in weight.
Want to see what other backpackers actually carry inside their packs? Check out my Backpack Shakedown post.
First-Time Buyer Strategy: Smart Shopping Tips
Here’s my step-by-step approach for first-time buyers:
- Borrow First: Try to borrow a pack for your first trip. You’ll learn what features matter to you without the upfront investment. Don’t be shy about asking – most experienced backpackers love helping newcomers get outdoors!
- Visit a Store: Even if you buy online later, try on different packs with weight in them. REI and other outdoor retailers have sand bags you can use to simulate a loaded pack.
- Read Reviews Carefully: Look for reviews from people with similar body types and planned uses. A pack that works great for a 6’2″ male might be terrible for a petite woman.
- Consider Used Options: Check REI Used, Facebook Marketplace, and gear swap groups. Backpacks are durable, and you can often find excellent deals on barely-used gear.
- Plan for Growth: Your gear will evolve, and so will your packing style. Choose a pack that can handle some variation in load size and type.
Common First-Timer Mistakes to Avoid
Based on helping dozens of friends choose their first packs, here are the biggest mistakes I see:
Buying Too Small: New backpackers often underestimate how much gear they need. It’s better to have extra space than to struggle with an overpacked small bag.
Focusing Only on Price: A cheap pack that doesn’t fit properly will make you miserable and potentially cause injury. Invest in proper fit over rock-bottom pricing.
Ignoring Women-Specific Designs: If you’re a woman, seriously consider packs designed for female anatomy. The difference in comfort is significant.
Buying Online Without Research: Always know your measurements and read detailed reviews before buying online.
Maintenance and Care: Making Your Investment Last
A quality backpack should last decades with proper care. Here’s how to maximize your pack’s lifespan:
- Clean it after every trip – dirt and grime break down fabrics
- Store it loosely packed, not compressed
- Check and maintain zippers regularly
- Repair small tears immediately before they become big problems
- Keep it out of direct sunlight when possible
Final Thoughts: Making the Right Choice
Choosing your first backpack is a big decision, but it doesn’t have to be perfect. Focus on proper fit, adequate volume, and essential features. As you gain experience, you’ll learn what matters most for your hiking style and can upgrade accordingly.
Remember, the best backpack is the one that fits your body, suits your adventures, and gets you excited to hit the trail. Don’t get paralyzed by analysis – sometimes you just need to pick a good option and go hiking!
The most important thing is getting outdoors and creating memories with family and friends. Your backpack is just the tool that carries the gear that enables the adventure.
Have questions about choosing your first backpack? Share your specific situation in the comments below, and I’ll do my best to point you in the right direction. Happy trails!
This guide is based on 15+ years of personal backpacking experience, testing over 20 different packs, and helping numerous friends and family members choose their gear. While I may earn a small commission from affiliate links, I only recommend products I’ve personally used and believe in. Your adventure starts with the right gear – choose wisely and get out there!


