
Want to clean and whiten bones or a skull? The first step is to get the soft tissue off the bone.
This is actually one of the trickiest and most time-consuming steps of cleaning bones. If you don’t do it correctly, you can end up permanently damaging the bones, losing bones (especially small bones like finger bones or vertebrae), or you might have issues with scavengers carrying away your bones!
There are six different methods to clean tissue off of bones before you whiten them. The choice depends on factors like:
- The size of the specimen
- How much tissue is remaining
- How much time you have
Jump to:
Methods for Removing Tissue from Bones
1: Burying

Best for: Large bones and skulls with lots of tissue remaining; rotting carcasses
Dirt might seem like there’s nothing going on with it, but there’s actually a party of bacteria and other microorganisms in dirt.
When you bury a carcass in dirt, these microorganisms will eat the tissue around the bones. Some worms and bugs might help clean off the tissue too. They won’t eat the bones though, so they will be safe.
The great thing about this is that bacteria can get into all those tiny little crevices. That means you won’t have to do things like “scramble” the brain to remove it. (Gross!)
How Long Does It Take?
It depends on how big your specimen is, how much tissue is on it, the temperature, and even the type of dirt (some dirt is much more active than other types).
You might get lucky and only have to wait a few weeks before the tissue is all gone. Or, it could take up to 3 months for a large animal carcass to fully decompose.
Potential Problems
One potential issue is that scavengers can dig up bones that you buried. Even worms/insects can move around bones a lot in the dirt.
To keep your bones safe and make them easier to find when you dig them up, I’d recommend that you put the carcass in a wire mesh (for larger bones) or a muslin sack (for smaller bones).
Note that the dirt might stain the bones a bit, but this can be removed later during the whitening process. It’s best not to bury antlers since you probably want to keep these their natural color (more on preserving antlers and antlered skulls here).
Method 2: Insects/Leave Out in the Open

Best For: All types and sizes of bones; rotting carcasses
Professional taxidermists use insects like dermestid beetles to remove tissue from bones. You probably won’t want to raise these yourself, but you can still harness the tissue-cleaning power of insects.
Leave the corpse or bones outdoors, preferably over an ant hill if you can find one. The insects will do a great job of eating tissue out of those hard-to-reach places on bones and skulls.
How Long With It Take?
If you are able to put the carcass next to an ant colony, then it might be completely cleaned within 1-2 weeks. Otherwise, expect this method of cleaning tissue off of bones to take at least a month.
Potential Problems
Like with burying bones, you can expect scavengers to carry away the bones. You’ll need to put the bones in a wire cage so insects can still get to them but animals cannot.
Method 3: Corpse in a Box Technique
Best For: Small animals with lots of tissue on them
Small bones easily get lost in the dirt when you bury them. And, if you try to leave them out in the open, you will likely lose their tiny bones.
One solution is to use the “corpse in a box” method. You simply:
- Get a box that has a lid. Old ice cream containers work well.
- Poke some holes in the box.
- Put the corspe in the box.
- Keep the box outside somewhere covered so it won’t get flooded by rain.
Insects will enter the box through the holes and lay eggs. The eggs will hatch into maggots, who will happily eat the tissue off of the carcass.
How Long Will It Take?
Expect it to take at least 1 month to get completely clean bones. If the carcass only had a bit of tissue on it and there are lots of flies that get at the bones, then it might be done faster.
Potential Problems
The only main issue is that insects won’t eat fur of feathers off of the carcass. You’ll end up with a box full of tiny bones and have to carefully separate them from the fur/feathers. This is a pain — but this is an issue with small animal bones regardless of the method you use for cleaning tissue.
Method 4: Maceration (Soaking)

Best For: Bones without a lot of tissue left on them
Soaking bones in water will soften the tissue and allow you to scrape it off. There are also lots of microorganisms in the water which will eat away at the tissue. So, you end up with very clean bones. This method is especially good at getting rid of tissue in tiny crevices in skulls.
Brains are pretty rubbery and won’t break down like other soft tissue will. So, you should remove the brain before macerating skulls. This is really nasty. You have to take a wire to scramble the brain and then shoot it out with a hose. Ideally, you wear goggles and waterproof coveralls so you don’t end up with brain all over you.
How Long Will It Take?
It takes a very long time to get the tissue off with maceration. Expect weeks or even months of soaking!
You can speed up the process by adding biological cleaning powders/enzyme stain removing powder such as Biotex (which you can buy here) These cleaners contain enzymes which will break down the soft tissue. However, there is a lot of controversy amongst professional taxidermists as to whether this damages bone or not.
Potential Problems
The maceration method is VERY disgusting. You’ll have a bucket filled with stinky tissue. You’ll have to dump/change the water at least once daily.
I don’t have a backyard, but I did macerate small animal carcasses in jars in my bathroom. I puked when I opened the jars to change the water, the smell was that bad. And the smell lingered for a while. I apologize to my family!
Also, be careful that you don’t lose bones or teeth when dumping the water. Ideally, you dump the water into the grass so you can retrieve any bones that come loose. Or, dump the water through a sieve.
Method 5: Simmering
Best For: Fresh carcasses when you are in a hurry
If you have a fresh carcass with all of its tissues on it, then you can simmer it to remove the tissue. The hot water does wonders and loosening tissue so you can scrape it away.
However, for reasons we’ll talk about below, you shouldn’t let the water get to boiling. Make sure that you keep the temperature down low and monitor the process.
How Long Will It Take?
You’ll want to put the carcass or skull into the water and then bring it to a simmer. After about 10-15 minutes, remove the carcass and scrape away as much tissue as you can. You’ll also need to scramble and remove the brain at this point. Some people leave it simmering for up to an hour before scraping.
After scraping away the tissue, dump the water (being careful that you don’t lose any bones in the process) and simmer again.
Note that simmering isn’t going to do a great job of getting rid of hidden tissue. Ideally, you macerate the bones or leave them outside for microbes to clean before going on to the whitening step.
Tips
Try to remove as much hide and tissue as you can before simmering. This will prevent the water from getting too gross, and then that grossness getting absorbed into the bone.
A lot of people put additives like OxiClean into the simmering water. This supposedly helps break down tissue and also get fat out of the bones. A lot of people swear by it. But a lot of other people also say that OxiClean will destroy bones, causing them to literally turn to mush. It seems to be okay on deer skulls, but probably not okay on fragile bones. Try this at your own risk! Or, better yet, be patient and just bury the bones to get the tissues off. It will take longer but the results will be much better.
Method 6: Steaming
Best For: Smaller bones with lots of tissue remaining
While I haven’t tried this personally, Jake of Jake’s Bones uses a baby bottle sterilizer for cleaning tissue from bones. Basically you steam the bones inside the sterilizer.
The steam will loosen tissue quickly. Since the bones aren’t floating in tissue-filled hot water, the fat won’t absorb into the bones. Nor will the heat damage the bones. Jake warns that it will smell disgusting!
Removing Brains from Skulls
This is gross. Really gross. I’m still pretty squeamish, so I will avoid doing this at all costs. With the burial, insect, and “corpse in a box” methods, you can leave the brain in the skull. Microbes will eat it away for you.
However, if you want to use simmering or maceration to remove tissue, you’ll have to remove the brain. Brains are really fatty and rubbery, so won’t come out so easily on their own.
Here’s how to remove a brain from a skull:
- Soak the skull to get the brain tissue soft (or give the skull a quick simmer)
- Take a wire/coat hanger and start jamming it into the skull. The goal is to “scramble” the brains. This is something the ancient Egyptians mastered thousands of years ago. 😉
- Get a power washer and blast into the back of the skull. Brains will shoot out of the nose. WEAR GOGGLES unless you don’t mind getting pieces of brain in your eyes.
- Or use a saw to cut off part of the back of the skull and scoop out the brains. Some skulls (like deer skulls) sit better on their mount when the back is flat anyway.
Hidden Tissue in Skulls
Be warned that there is a lot of tissue hiding in animal skulls – especially big animals. For example, there are often giant nerve endings inside teeth.
You will also have nerves going through foramina in skulls. Foramina are holes where the nerves go from the brain to the face.
To remove this tissue, you may need to:
- Carefully remove front teeth with pliers. Wash/poke out nerve endings. Make sure to reinsert the teeth while the skull is still wet. Otherwise the bone shrinkage might make it impossible to get teeth back in. Ideally, you remove molars too but these are really difficult to get out.
- Use wire to poke tissue out of foramina: This only works to a point. You’ll be able to get some of the nerve tissue out but probably not all. One more reason microbes do the best job of cleaning bones!


This pig skull had been boiled and appeared to be free of tissue. But when I started soaking the skull, lots of tissue started coming out of the foramina.

Look at all the gunk that was stuck in the jaw under the tooth!
What about Boiling Bones to Clean Them?
In many forums and websites, people recommend boiling bones to remove the tissue. Yes, this works very well. It only takes about 2 hours of boiling for most of the tissue to fall right off.
But boiling is a terrible way of cleaning bones. It can turn them yellow, make them start rotting, and damage fragile bones.
Here’s why you should NEVER clean bones with boiling.
Boiling Traps Fat in Bones
Our bones are very much alive. They have their own blood vessels and nerves. Bones are also little “factories” in that they produce blood cells in their marrow. Guess what marrow contains? Lots of fat!
If you boil bones, the heat will seal the fat into the bones. They will turn a gross shiny yellow color.
Not only does this look terrible, but the fat trapped inside can start to rot. As it deteriorates, it can destroy the solid bone tissue. The bones will end up smell really bad. And, over time, the bone can crack.
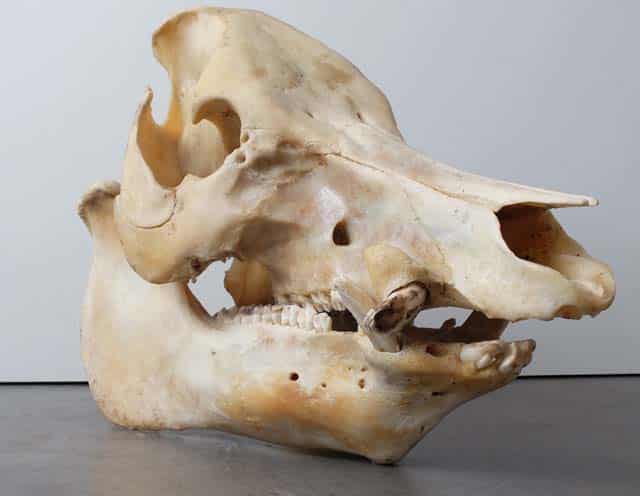
Check out this pig skull which was boiled. The gross yellow spots are fat!
*It is possible to remove trapped fat with a process called degreasing, but it’s a major pain and takes forever. The pig skull above took MONTHS to degrease! More on degreasing in my book.
Fat from Tissues Get in the Bone Too
Not only do the bones themselves contain a lot of fat, but there is tons of fat in the hide and tissues of an animal. Brains, for example, are about 29% fat. The human brain is even fattier at about 60% fat.
When preparing bones for cleaning, you should remove the skin, brain (which is a pretty gross process), and as much tissue as possible.
If you skip this step and boil an entire corpse, he fat from tissues will get in the water. This fat then gets absorbed into the bone where it becomes trapped. The bones will end up even more fatty and gross.

Check out how nasty the boil water is. The bones will absorb all the gunk.
Boiling Traps Tissue in Skulls
As bone enthusiasts know, skulls have so many little nooks and crannies. When the animal is alive, these nooks are filled with nerves, blood vessels, and other tissues.
If you boil a skull, all of these tissues will get trapped in the nooks. It is really difficult to remove the tissue afterwards!
It is especially bad in the foramina. A foramen (plural foramina) is a little hole in bones where nerves or blood vessels go through.
You can try to remove the tissue by poking a wire inside the foramina. However, this is actually hard to do. Instead of removing the tissue, the bits of nerve and blood vessels often just get pushed further up inside.

All this nasty tissue was still stuck in the boiled pig skull. It started to come out during the degreasing process.
Boiling Damages Fragile Bones
Some bones are particularly fragile and won’t withstand boiling well. One example is juvenile animals. Their skull bones haven’t completely fused together yet.
Boiling will dissolve the connective tissue holding the skull together and ruin your beautiful skull.

This juvenile fox skull fell apart after being boiled. 🙁
What Next?
After the tissue has been removed, you’ll need to get the grease out of the bones and whiten them. In my ebook, you can read all about how to do it, plus instructions for horns, antlers, bird skulls, fragile bones, and more.
Get the book here. It’s only $4.99 and will teach you how to clean bones without any special equipment.
Resources:
https://aminoapps.com/c/vultureculture/page/blog/bone-cleaning-fact-and-fiction/Gxpl_2oFnuJoE4aQ28PmMlpmoZMoo7KYqP
https://www.oddarticulations.com/degreasing101/
https://www.archerytalk.com/vb/showthread.php?t=796269
http://www.bearmeadow.com/build/materials/bone/html/bone-clean.html
https://www.britannica.com/science/bone-marrow
https://www.sciencedaily.com/terms/bone_marrow.htm
https://www.endocrinology.org/endocrinologist/126-winter17/features/why-are-our-bones-full-of-fat-the-secrets-of-bone-marrow-adipose-tissue/
https://www.ncbi.nlm.nih.gov/pubmed/20329590
Image credits:
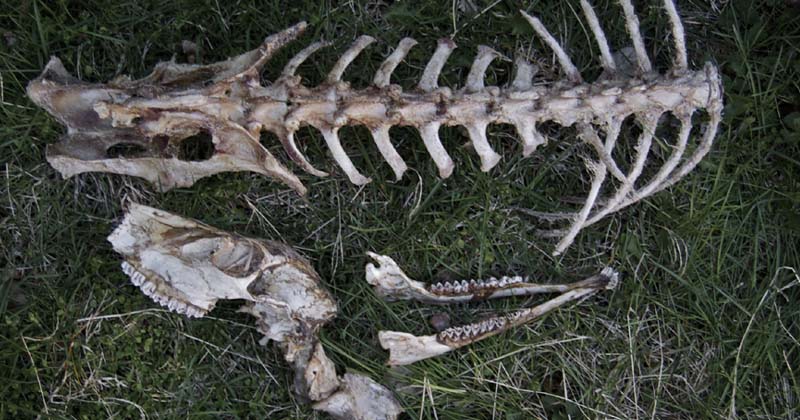
“Deer bones (https://www.flickr.com/photos/jive667/5570141604/)” (CC BY-ND 2.0) by jive667
“Skull: Head-on” (CC BY-NC 2.0) by Travis S.
“Mini Facehugger” (CC BY-NC 2.0) by Travis S.


34 Comments
Kris
November 8, 2020 at 12:49 pmHi from another upstater (actually Finger Laker) in NY.
Very clear instructions that anyone can follow and using standard supplies! Well done!!
My method for degreasing combines degreasing and maceration at once…kind of.
After stripping off as much muscle as I can I place my bones into a pot of cold water mixed with trisodium phosphate. I used to use Soilax, but that is gone and i have been using a Savogran product simply called TSP. (https://i5.walmartimages.com/asr/0c3ac03f-c6e2-478c-bdb6-f6204fe38066_1.eeb71eebd2382278f8e5110a2422109d.jpeg)
I bring the pot to the boil, then reduce to simmer for up to an hour. The TSP seems to jellify the meat and sinew and draw the grease from the bone at the same time. The water level must be well above the bones so that the fats can float above the bones.
I like to do a second boil/simmer/soak for things like bear or raccoon skulls. These species have a lot of grease in them and the second soak really helps.
After the water cools I put in a drop of Dawn dish soap to scatter the floating oils to the sides of the pot and retrieve big bones through the clear water in the center. Then I pour off the water to get rid of the fats, and retrieve all the small bones or teeth that have fallen out.
You still need to use a wire to remove tissues from inside the jawbone and from the roots of the canines, but it is easier now than when fresh.
The results is squeaky clean bones ready for bleaching, sealing and assembly for display.
I have been using common peroxide for bleaching by soaking overnight. I use superglue for putting the teeth back in, and epoxy for gluing the lower jaw halves back together.
If I am giving the prepared skulls or bones to someone for display, I find that a clear spray shellac is better than polyurethane as a sealer. I get mold under poly, but never under shellac.
Diane
November 9, 2020 at 11:00 amThanks for these tips. Some “professionals” are against the idea of macerating and degreasing at the same time; adding anything to the macerating water can kill the bacteria which eat away the tissue. But I say screw it: if it works, it works 🙂
Madeleine
January 27, 2022 at 10:47 pmI’m using this as reference for a book I’m writing, and I have to say I laughed *really hard* at the section you talk about removing teeth. The typo for “removing morals” instead of molars is funny from the perspective of someone reading this for reference on how my killer is cleaning the bones of his victims.
Diane
January 28, 2022 at 1:51 pmThat is a funny typo. I’m going to update it though. 🙂
Nilarun Manna
January 8, 2023 at 12:01 pmI recently found a flying fox carcass and it’s really old, insecta have done it’s job and i cleaned it up a lot. But the thing is, i am unable to remove the dry skin from the bones. Really need some help.
Diane
January 10, 2023 at 5:59 pmYou need to soak it a bit to loosen the dried skin. Then gently peel off as much as you can, soak and repeat. Those small animals can be really tricky to get the tissue off of — the bones are so fragile!
Nicki S
February 6, 2023 at 8:27 pmAs someone who doesn’t like dead things, but has a daughter interested in bones, I’d like to thank you for this page. 1) you didn’t show anything really except bones so I wasn’t turned away by the images, and 2) you gave a lot of options for cleaning bones with good information on each process.
Thank you
Diane
February 9, 2023 at 9:07 amWhen I started on this journey with my daughter, I also was really grossed out by dead things. I still find it gross but can now handle bits of brain tissue without gagging 🤣 But definitely use the burying method if you want to avoid seeing gross things!
Erin H
February 18, 2023 at 10:12 pmI found a pretty clean deer mandible and have soaked the bones in soapy water for a couple of days, I’m ready to soak them in hydrogen peroxide but I noticed I cannot get out the tiniest bit of tissue from the hole on the inner part of the jaw. Will the small amount of tissue cause and issue after soaking in peroxide and drying them? Or should it be okay? Thank you! 🙂
Diane
February 22, 2023 at 12:36 pmThe bubbling from the H202 will usually get tissue out of those annoying holes (they are called foramina). It won’t cause any issues while soaking. You could also try putting a squirt of un-diluted H202 directly on the stuck tissue before soaking it to help release it.
Maria
March 17, 2023 at 5:14 pmsuper interesting page. thanks for sharing so much information! reading the comments I’m curious how/why you got started if you were initially grossed out by dead things? But my real question is if there are options that are better to keep ligaments intact on gopher sized animals, while the rest of the muscle, etc gets cleaned off? Or do we just have to let everything get cleaned off and then put back together like a jigsaw puzzle?
Diane
March 17, 2023 at 11:15 pmMy daughter got me started back when she was about 4-5 years old. She liked bones so much that I decided to learn to clean them. I definitely barfed a bit the first time bits of brain came out of a skull (which otherwise looked clean!). 😀 I still get realllyyy grossed out by bird feet. You have to cut all the tough, sinewy tissue off them. And it just turns to a gelatinous glob when soaked.
For small animals, yes, it’s possible to leave the ligaments on. But it is next-level taxidermy. Even a lot of professionals have a tough time getting it correct. You can find info on that here: https://www.theboneman.com/skeletoncleaningoxidationmethod
The Dustman
April 16, 2023 at 10:23 pmDiane, this is my first time doing this type of project. I want deflesh a mouse carcass, I’m not in a hurry, I just want to reassemble it for the challenge and then display in a small glass case. I’m thinking I’ll put it inside a little screen cage with several larger holes for bigger bugs to get in, set it by an ant hill and secure the whole thing w/a bigger box or something. But I’d like to be able to keep some of the ligaments intact to make assembly easier, do you think this is possible with a specific length of time or just monitor it daily after a week or so? Any input would be very much appreciated, thank you
Diane
April 17, 2023 at 3:02 pmThat’s actually a very ambitious first project. Mouse bones are TINY and it’s going to be very difficult to put them together. You are correct that it will be easier if the ligaments stay intact to hold the tiny bones together.
I recommend that you skin the mouse first to remove the fur (this is something I am unable to do — it still grosses me out too much). Otherwise you’ll have an almost impossible time of finding all the tiny bones in the pile of fur left over.
Since mouse bones are so small, you don’t need to make bigger holes in the screen. Insects will still be able to get in! And you don’t want insects to carry away parts of the mouse through the holes. And bacteria will also do its job, so tiny screen holes are okay. A plastic container with a screen cover/lid would work well. Ideally, turn the container upside down so the screen side is down (that allows “juices” to drip out instead of collecting in the container). Ants could even eat the flesh through the screen without actually getting into the container. You are right that you need to secure the container somehow so it doesn’t get carried away.
As for the ligaments, it’s tricky to control how much remains (even professionals have trouble with ligament mounts). You could let bugs eat away at most of the flesh. And then, when there’s just a bit of flesh left on the bones, macerate the rest of the flesh off. Ligaments stay put even when soaked for a long time. Yes, you’ll need to monitor it daily.
But, this is very ambitious of you. I’d recommend looking for a roadkill dog or other mid-sized mammal. Or maybe set your goal to mount just the skull + vertebrae of the mouse. That would look cool and be a LOT easier (you just thread a wire through the vertebrae so no need to glue them together. Even if you lose a vertebrae or two, it won’t be noticeable). That will save you the painstaking task of trying to piece together tiny toe bones.
Zakaria Miken
June 21, 2023 at 1:32 amI totally love your site and this discussion about bones! I tried a modification of your “corpse in a box” method to try to skeletonize a dead baby possum we found in the yard. Unfortunately, left it for over a year instead of a few weeks (I confess impulsively changing interests.) When we came back to it, we salvaged a few jaw bones, and other major bones, which is quite awesome, thank you, but are most perplexed by what appear to be like broken eggs inside the can (box). They range in size from about 1/8″ to 1/2″ in diameter. Any ideas of what they might be?
Diane
June 21, 2023 at 8:49 amthose are most likely pupa casings (cocoons) of the insects which went in their to eat the dead tissue. That’s exactly what you want to get rid of the tissue 🙂 It could be from any insect. The cocoons come in all sorts of shapes and sizes. If they are white and round, then it might be ant cocoons.
Colleen
June 29, 2023 at 2:36 amWe boiled a bear skull in hopes that the meat would fall off. Only about an hour but now I’m reading this and I fear we’ve wrecked it. We put it outside so hopefully the flies would lay eggs and eat the rest of the meat that didn’t come off. Do you have any advice for us? Did we wreck it?
Diane
July 3, 2023 at 2:19 pmI want to be optimistic and say that you didn’t ruin the skull. But you almost definitely did make your degreasing process even harder, especially considering that bears are one of the greasiest animals and always a pain for degreasing.
As for getting the tissue off, soaking (aka macerating) will be probably faster than waiting for insects. It can take a while regardless. If you have an anthill somewhere, put the skull on top of the anthill (with some sort of cage over it so animals don’t carry it off). They will clean it fairly quickly.
And, when it’s time for degreasing, you might want to immediately add some ammonia to the soapy water. That will make the degreasing much faster.
Ghost katio
July 3, 2023 at 3:57 amAny ideas for a fresh bird corpse? Right now i have it in a container with small holes in it (corpse in a box method). But i don’t know what to do from there. I want to try to keep all the bones and then glue them together. But i don’t know how to get the flesh off the feet and i don’t know if i have to pull off the feathers.
Diane
July 3, 2023 at 2:39 pmYes, plucking the feathers and skinning the bird befor ethe “corpse in a box” method would be best. That will make it easier to find the bones afterwards instead of having to pluck them out of a pile of fluffy down feathers. You should also try to skin the feet as insects usually don’t eat it. And it doesn’t come off easily when soaked either because it is mostly made of tendons and lots of keratin. The feet are disgusting IMO. I puked because of macerated bird feet. :/
As for gluing the bones together, you will quickly realize that bird bones are VERY tiny and fragile so articulating them is hard. If this is your first time articulating animal bones, I’d honestly start with something easier. I don’t want to discourage you though. There is an advanced method where people don’t remove the connective tissue from the bones (insects don’t really eat this and it stays in place even when soaked for a long time, so you can get rid of the meat while keeping the connective tissue). The connective tissue dries and holds the bones together. I’ve never successfully done this though. Here’s info on that: https://www.theboneman.com/skeletoncleaningoxidationmethod
Elorah
July 16, 2023 at 7:58 amI have been burying deceased cats from my sanctuary in a container with dirt. I added maggots and earthworms. They decompose pretty quickly, especially in this heat. Theres a lid on it and I bury them deep enough so you can’t smell them. There’s a lot of hair left, but thankfully most of it comes off pretty easily. And some of the bones were already clean so I just soaked them in some detergent and a little bleach. I’m not worried about getting them really white. I just want to clean them and put them in a box, like an urn. (I had the first dozen cremated, but then it got too expensive.)
But the rest of the body, like the rib cage, is still held together with connective tissue and hair that I can’t get off. I was wondering if dermestid beetles would clean the rest?
If you have any suggestions, I’m all ears. Thanks for all your information. 🧡🐱
Elorah
July 16, 2023 at 8:05 amBtw, there’s no way I could skin and gut any of these cats. I understand that that might be the most expedient method. I’m amazed I’m able to handle the bones and the rest of the decomposition. But skin and guts? Nope nope nope.
Diane
July 17, 2023 at 10:06 pmThat connective tissue can actually stay. Once it’s been soaked in hydrogen peroxide, it doesn’t stink. Some people intentionally leave it there because it makes it easier to articulate (put together) fragile and small bones, like from birds. I’ve got a cow spine I’m working on and the connective tissue on that is CRAZY tough! Months of soaking didn’t get rid of all of it!
Michelle Koenig
July 18, 2023 at 7:31 amHello Diane. I too am fascinated by bones. Natural History museums and some of my favorite places, and my interest was really stimulated after a visit to the Sedlec Ossuary in Kutna Hora, which holds an incredible 50,000+ human remains that had been salvaged from the local cemetery and used to create elaborate decorations inside the chapel. Check it out. It is eerily beautiful.
Anyway, I am an animal lover and saw a driver ahead of me swerve to deliberately try to hit a baby coyotes that were following their mother across the road. The last one was hit and mortally injured and lay in the center of the road suffering. I was horrified and pulled over to get him out of the road to prevent the mother from getting hit trying to save him, since she had 2 other pups. Fortunately, on the shoulder he died after a few minutes due to severe internal injury and his insides coming out. After a bit of a think I decided to take him home to bury and possibly try to salvage his little bones. This was a few days ago, before I saw your site, so I fear I may have done myself a disservice by just burying him in my garden without a cage or other suggested mechanism to keep the bones together. It is within my fenced garden, so being dug up is probably not going to be an issue, but I am sure I did not do this properly after reading your listed methods. I am tempted to dig him up again while still in (assuming) solid state, but not sure if it will be worth it. Any suggestions? Mind you, he was buried directly in the soil, just as he was, without the removal of any fur or flesh. Thanks in advance.
Diane
July 18, 2023 at 11:11 amWow! People are jerks. 🙁 I’m glad the pup died fairly quickly at least. And that his body is getting some good use.
I would definitely dig it up and put him in some sort of sack. Or use the “bones in a box” method — just a large plastic container with a lid and lots of holes poked into it (top and bottom so liquid can drain out). Then it’s just a long waiting game for the microbes to do their work. In any case, it’s a lot less disgusting than skinning and soaking the animal!
Baby bones can be very fragile, so hopefully you don’t experience any breakage. It also won’t be fun sifting through the fur to find the tiny bones. But canine bones are usually pretty easy since they aren’t greasy, so this is actually a good animal to start with.
And, yes, Kutna Hora is cool 🙂
Katie Rudman
September 18, 2023 at 7:37 pmAny ideas on how to remove the sinew tissue from rabbit leg bones? I have degreased and left soaking in hydrogen peroxide 12% for 48hrs- the bones are clean and white but the sinew has remained and i’d like to remove it!
Diane
September 19, 2023 at 2:41 pmTry letting the bones dry out completely. Then the sinew can be flaked off or scrubbed off with a soft brush.
aspeyenn
January 29, 2024 at 6:15 pmany advice about removing a vein/artery from a adult jackrabbit skull? Unable to get bugs to clean it this time of year. The vein/artery is a lateral nasal, so right above the teeth in the nose canal.
it has been degreased/soaked a bit + the brain is removed if that helps.
Diane
January 29, 2024 at 7:12 pmIf there are still veins in there, then you need to macerate longer. Once properly macerated, you should be able to flush out the gunk inside the nasal cavity with water. Not too hard or you can damage the delicate “concha” bones in there. Some very long, pointy tweezers can also help. Some people use dental tools, though I personally have never tried that.
aspeyenn
January 30, 2024 at 4:42 pmthank you!
forgot to add that this skull is also 50-60 years old of that changes anything. I removed the teeth to see if that would help with the process.
Diane
January 31, 2024 at 11:11 amA skull that old still has tissue in it?!! That’s kind of crazy. I’m assumming that it’s all dried up and stuck inside then. Since it’s so old, you can try going straight to hydrogen peroxide. The bubbling can loosen up the dried tissue and cause it to come out. 🙂
Aspeyenn
February 1, 2024 at 3:48 amyes, it’s quite surprising! It had almost the entire brain. Thanks so much for the help!!
McKenna
March 27, 2024 at 1:16 amThis is really helpful!! there’s a dead cat on the way to my school and it still has skin and fur and everything (Its been there a few months) (I also found a dead deer today on my way home, dont think she’ll lemme cut its head off lol), I’m going to try and convince my mom to keep it, i already have a cat skeleton from my sisters front yard (she was a cat at my aunts barn who died 6 years ago) and surprisingly it had a tiny bit of gum on the roof of its mouth when I un dug it, anyways this is a really nice thing, thanks!!
Diane
March 27, 2024 at 11:28 pmCutting a head off a dead deer can be a bit tricky. You’ll need a serious knife or saw 😀 Tell your mom that you’ll wear gloves and other protective gear and maybe she will be more inclined to let you take it.
This post should also be helpful. It deals specifically with roadkill and how to make sure you don’t end up with maggots or other nasty things all over you or in your home! https://momgoescamping.com/collect-roadkill-bones/